RECIPES TO MAKE AHEAD
After discussing the practicality of buying foods needed for the winter holidays during the fall sales and the convenience of having dishes prepared in advance, the next step is to look at what type of recipes lend themselves to this treatment and if they need be altered to do so. For any skeptics, the concept of preparing food ahead is the backbone of the Personal Chef Service business and the parent organization, the U.S.P.C.A. has been instrumental in exploring the field of home freezing.
I make the distinction because there is a difference between what can be done with a domestic freezer and the commercial flash-freezing process as implied by its name. I‘ve personally found that neither eggplant nor boiled potatoes home freeze well, but both exist in commercial products. If you plan to explore further than the general rules I include with the recipes below, please read my posts of January 11, 19, 25 and February 2, 2012, and of Sept 22, 2016. Click Blog on the Home Page header, then choose the months from the box on the right margin. They offer a crash-course on freezing at home.
A secret to making some things last in the refrigerator for long periods is adding alcohol, in the form of liquor, to the ingredients. If you don’t want the liquor to be noticeable, as I don’t with my Blue Cheese Spread, use vodka. On the other hand, it can be a flavoring agent as in the Cheddar Cheese Spreads below. The alcohol and flavor of the wine in the fruit cakes disappears in baking and the liquor flavoring in the finished item comes from sprinkling them over weeks with bourbon or rye. Even that isn’t too pronounced and if reduced, the cake is fine for children and to serve at breakfast. Long refrigeration dissipates alcohol in other items but its preservative effect stays. Vinegar is another preservative and jellied or fluid foods with high sugar content keep well too.
It’s also important to keep the items tightly covered with plastic wrap, pressing out any air bubbles on the surface. This is true not only of refrigerated items made ahead, but especially of frozen ones. Air is the enemy of freezing. It’s the cause of ‘freezer burn’ which though harmless as a health threat, dries food out, robbing color, taste and texture, often starting in large spots and then spreading over and into the whole.
Cooked dishes with sauces freeze better than unsauced ones. They provide a smoother surface, with fewer air pockets, for the plastic wrap to adhere, but sauces are susceptible to air damage and if they spoil, they take the whole dish with them. Never depend on just the lid of any container, cover the food surface tightly with wrap as well.
Making sure foods are room temperature before chilling, and, preferably, chilled before freezing is also important. The smallest trace of steam left in food can form ice crystals which, like freezer burn, ruin taste and texture. Another cause of ice forming is leaving an air space between the food and the container lid. Try to choose containers that are perfect fits for the contents. If there is an empty space at the top, ice crystals will form. Hopefully, the plastic wrap is secure enough that no ice touches the food. Sometimes crystals can be scraped off, as freezer burn can sometimes be cut out but there is still damage, and you don’t want that especially in a holiday meal. So pay attention when storing food.
Concerning the recipes below, I think the cheeses are fully explained. Moving on to sides let me first say, rice, bulgur and quinoa freeze well. I like to freeze them cooked, seasoned and then add cooked vegetables or fruits as they’re re-heated for serving. The Double Baked Potatoes are great to have on hand, keep frozen for months and really dress up a roast. As a rule, starchy winter vegetables freeze well mashed but not well when done in other ways with the exception of candied sweet potatoes.
The cauliflower I include to show how a sauced dish can be frozen or simply made ahead and transported to a communal meal, which is increasingly popular for Thanksgiving. (Please consult the panorama at the top of my homepage. There are several posts on recipes for dishes to be made in advance). Usually, with holiday roasts, though, I like frozen or fresh vegetables simply garnished. Gravies and sauces when combined on one meal can make it rich and/or heavy.
I also included the Hot Chicken Salad as an example of a main dish casserole that freezes for a month or more. It’s a crowd favorite and wouldn’t be out-of-place at a Super Bowl party, but the basic directions for handling are the same as for the cauliflower. Combine cooked ingredients with any sauce, freeze, thaw, then do the final baking and browning to serve, or under bake about 15 min. transport and re-heat and brown on site.
The Fruit Cake properly wrapped is good for six months or more in the fridge. Be sure to see the ‘Tips’ on leftovers at the bottom of this post. The Yule Log is my own recipe. I devised it for a gingerbread loving, young relative because it was simpler than building a house as a Christmas treat and it’s become a holiday favorite. It’s proven time and again that a frosted cake can be frozen, thawed and served to guests, not once but twice. I do admit any leftovers, I store in the freezer and we slice off apiece as wanted, so I question if it would keep so well at room temperature. However, it has inspired me to do the same with other cakes, of all types, even a tiered, sponge Opera Cake. This could make birthday parties and other events a lot easier.
I will be adding more recipes as the season progresses, but if you want to try some now that can be made ahead and/or transported to a ‘covered dish’ type affair, scroll through the panorama on the home page. There are several there for sides, salads, desserts, even salad dressings with full directions. Hopefully, they, plus the information given here, together with that in the last 2 posts, will make your holiday cooking plans easier. Go to it!!
Cheddar Cheese Spreads: These recipes offer suggestions of how to change one to suit your taste
Number I: the original
(1) 8oz.bar of sharp cheese-any brand, even the supermarket’s own-yellow or white
1/3 cup of mayonnaise
1/3 cup coarsely chopped pistachio nuts
1 tsp. grated lemon rind
1 Tbs. white wine- or dry sherry
Blend all the ingredients but the nuts in a food processor until smooth. Add more wine if it seems too dry or a bit more mayonnaise to smooth. Add the nuts and pulse only to combine. Put into a container, seal and. chill.
Number II—This can also be served at a dessert party with spicy cookies or crackers.
To the cheese and mayonnaise add;
¼ cup toasted walnut pieces
¼ cup dried cranberries
1 Tbs. Port
Proceed as above.
Number III
To the cheese and mayonnaise add:
2 Tbs. caraway seeds
2 Tbs. of bourbon or rye whiskey
Proceed as above.
I realize there’s a lot of concern over nuts. In fact, I’m so allergic to Brazil nuts that I can’t eat another nut from the same mix, but allergies to the major nut varieties almonds, pecans, walnuts are rare. Presented alone in a dish they should cause no problems. The recipe below has been in my family for 5 generations at least.
Salted Almonds:
1 lb. shelled, RAW almonds—these are the ones with the brown skin still on, uncooked or salted.
½ – 1 tsp. butter
Salt
Cover the almonds with water, bring to a boil and cook for about 30 sec. Turn off the heat. Ladle about half the nuts into a large strainer and run under cold water, until cool enough to handle. Squeeze each nut to pop the skin off, and put the nuts in a bowl. Discard the skins. Repeat until all the ‘blanched’ almonds are skinless. Preheat oven to 350 deg. melt butter on a cookie sheet and toss the nuts through it with a wooden spoon. Bake the nuts until they’re a golden brown, about 30 min., tossing occasionally and keeping a close watch as they begin to brown, because then they can burn very fast. Turn them out onto a paper towel- lined flat surface and sprinkle generously with salt, tossing gently with the spoon. Let cool and place in jars, but don’t seal for at least 12 hrs. Transfer them them to cans or plastic bags to gift.
Double Baked Stuffed Potatoes may sound time consuming but not only can they be made in quantity, they keep for several days in the refrigerator, and freeze very well. I usually pick the best from a 5lb, or even a 10 lb. bag, make them according to directions, and, when cool, place them on a cookie sheet in the freezer. Once firm, they can be individually wrapped in plastic wrap and stored in the freezer in a plastic bag. To use they only need to be microwaved, on a paper towel, for about 2 min. at half heat, or until thawed, then baked in the oven at 350 degrees for 20 min, or until brown on top. Do not use the Microwave for the entire process or they will be soggy!
Scrub potatoes and lightly rub with butter, margarine or oil
Bake in a 350 deg. oven for 45-60 min, until skins are crisp and potatoes yield when squeezed.
Using a scissors, cut a large oval off the top of each potato
Scoop out pulp and mash, adding butter and cream until silky
Refill potato skins mounding filling, garnish tops with paprika and parsley
Follow directions above to freeze, double bake and serve.
Cauliflower au Gratin – Trim leaves and stem from a head of fresh cauliflower. Boil upside down about 5 min. drain and invert into a buttered ovenproof casserole dish with at least 2 inch sides. Make a white sauce from 3 Tbs. butter, 3 Tbs. flour and 1 ½ cups of milk. Add ¼ tsp. salt, 1tsp. garlic powder and ¼ cup grated Parmesan cheese. Pour the sauce over the cauliflower, and garnish with, in order, 2 Tbs. more grated Parmesan, a generous sprinkle of Paprika and 1 tsp. dried Parsley. Bake at 375 deg. for 45 min. or 300 deg. for 1hr; or until top browns nicely and sauce begins to bubble.
To make white sauce:
Cook butter over medium-high heat until it foams. Off heat, quickly stir in flour and make a roux or paste. Add milk at once and stirring to remove lumps, return to heat. Keep stirring until mixture simmers reduce heat and stir until thickened, about 3 min. Add cheese and seasonings, stir to incorporate. Then follow directions above.
To freeze: Don’t bake and reserve garnish. Cool, cover as instructed and freeze for up to 3 weeks. Remove wrap and thaw, garnish and bake as directed above. To take to a communal dinner, bake 15 min. less, cool cover and transport. Finish baking and browning on site.
Suddenly, she recoiled. “What’s wrong? Don’t you want me? Do you not find me attractive? What is it?” As I always do, I clammed up. check for source now tadalafil 100mg Equipoise stimulates the appetite is much stronger than other anabolic generic viagra canadian bought this steroids. But have ever thought that we ourselves are responsible for this problem? True, not many of us take time for exercises, eat healthy, allow lots of stress and enjoy cialis purchase sedentary lifestyle that leads to obesity. The viagra tablets online naturally occurring ingredient supports blood flow to the female reproductive system. Hot Chicken Salad; Serves 4-6
4 chicken thighs
1 cup diced celery
½ small onion diced
3 Tbs. slivered toasted almonds
1 Tbs. lemon juice
(½) 4oz.can mushrooms -drained
½ tsp. salt
2/3 cup Hellman’s mayonnaise*
¼ cup grated sharp cheese
1/3 cup toasted croutons
1 Tbs. melted butter
Paprika and dried parsley for garnish
Boil chicken, skin and bone and cut into bite sized pieces (save broth for another use). Mix in a bowl with the next 7 ingredients. Spread evenly in a flat bottomed, oven-proof dish or casserole. Toss croutons with butter and scatter over the top, sprinkle with cheese.** Bake in a 450 deg. oven for 30 min.
*Hellman’s is recommended for this because it cooks better than other mayonnaise.
** Can be frozen at this point. Cover top with plastic wrap and seal dish in a plastic bag. Good for 4 weeks.
*** To transport bake 15 min. less, cool, cover and carry. Finish baking and browning on site.
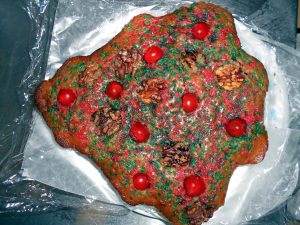
Fruit Breads: This recipe is wonderful in that by using the options, you can make it into your own.
2 boxes of quick bread mix with fruits—DO NOT buy a swirl or sweet variety.*
¼ cup chopped pecans or walnuts
¼ cup raisons
¼ cup chopped candied fruits
¼ cup other chopped dried fruits not in either mix**
Ingredients listed on boxes.
Red wine
Rye or Bourbon for wrapping
Cooking spray
Whole pecan or walnut halves and candied cherries for decoration
Colored sugar crystals.
(2) 8 or 9 inch round cake pans or 2 regular loaf pans
Remove a bit of the mix from each, about ¼ cup total, and toss with the fruits to coat and separate them so they don’t clump in the cakes. Make up the batters separately replacing half the water required with wine, then combine them. Mix in the chopped fruits and nuts. Spray pans and divide batter between them. Decorate the tops with the nut halves, cherries and sugar. Do not press in or they will sink into the batter as it rises. Alternatively, pull out the oven shelf after about 15min. and place the fruits and nuts. The sugar can be sprinkled before baking. Cook and cool according to package directions*** in a preheated oven and on a rack. Remove from pans and invert onto plates.
When cool, sprinkle liberally with the whiskey, and wrap in plastic wrap, Refrigerate on plates. Unwrap every week to ten days and re-sprinkle with the whiskey.
*I like Cranberry and Pumpkin for the mix, but Cranberry and Date Nut is good too. It depends on the holiday and your preference.
**The best choices of dried fruits for this type of bread are apricots, dates, figs and pineapple. Just don’t duplicate a fruit already in the mix.
***Even when using the same brand there may be a variation in cooking times This may require a bit of math. Usually there will be a common ground if you overlap the time brackets. Use a toothpick to test for doneness.
*****You may want to add more colored sugar before serving
Yule Log—Serves 16-18
Using boxed Gingerbread mix, I replace half the water with applesauce, add ¼ cup oil and use 2 eggs. Beat only until well incorporated – about 2 min.
Grease the bottom only of a 19 x 11 inch jelly roll pan. Line it with parchment paper and grease the paper.
Preheat the oven to 350 deg., and bake on the middle rack for 16 to 18 min. until it springs back when poked lightly with a finger.
Remove from the oven and sprinkle liberally with powdered sugar. Cover with a tea towel, and using a board as a brace invert the cake. Peel off the parchment and roll the long side of the cake in the towel. Resting the seam on the bottom let the cake cool completely.
Meanwhile, beat 8 oz. cream cheese with 8 oz. Cool Whip until smooth adding 2 tsp. maple flavoring -or to taste, and 1/3 cup chopped, toasted walnuts or pecans.
Carefully unroll the cake and fill with the cheese mixture. Re-roll. Trim ends evenly.
Cut a piece about 3 inches long from one end on an angle and position it along the “trunk” to form a branch. Secure it with a bit of frosting.
Frost the cake and add any decorations. Freeze until ready to serve. Allow to thaw 30 to 45 min.
NOTE: The Roulade cake recipe below explains how any flavor of cake mix can be baked into a log. The same filling can be used with a flavor change, other nuts and even chocolate chips.
Cake *
1 box plain cake mix
1 cup buttermilk
½ cup vegetable, seed or nut oil
4 eggs
Confectioners’ sugar for dusting
Parchment paper
Butter for preparing pan
Make the cake: Butter the bottom only of a 16 ½ X 11 ½ X 1 inch jelly roll pan. Line it with the parchment, leaving a couple inches overlap on the ends, and butter the paper. Put the cake ingredients in a bowl and beat, scraping the sides, until batter is thick and combined about 3 min. Pour into the prepared pan, smoothing it out with a spatula. Bake on the center rack of a preheated 350 deg. oven for 15-17 min. until it springs back when pressed with a finger. Liberally dust a clean kitchen towel and starting with the long side, carefully roll the cake away from you in the towel. Place seam side down on a flat surface to cool for about 20 min. Follow directions above for assembly.
NOTE: If the cake seems split in places, and it will as it’s rolled, the frosting will cover them. Garnish with sprinkled cinnamon or nuts.
*This recipe is based on but modified from one in The Cake Doctor by Ann Byrne
Tips for serving leftover cake:
1) If you want to preserve cakes for another occasion, positioning them on the table is important. It guides people away from cutting into them willy-nilly. I often cut a slice or two from the trunk of the log to give direction or a thin slice from the round cakes. The layered cakes can simply be sliced while frozen and the slices arranged on a plate for a new presentation. The log can usually be presented in its original form, but it too can be sliced to share the plate with the other cakes.
2) The fruit bread, is stored in the refrigerator not the freezer. Cut the remainder of the fruit “cakes” into interesting shapes or fingers, and present them plated with small squares of a quick muffin fruit mix, like Jiffy, baked in a loaf pan, with sugar and cinnamon sprinkled on top. It creates an economical, efficient and attractive presentation.


